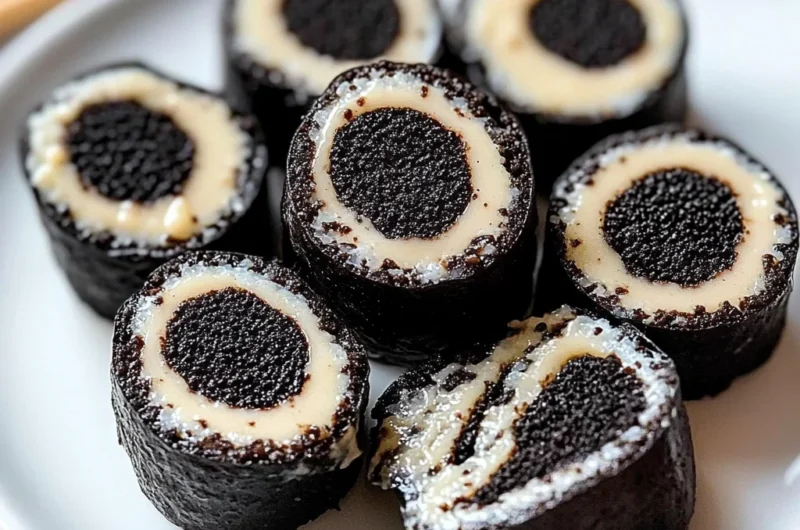
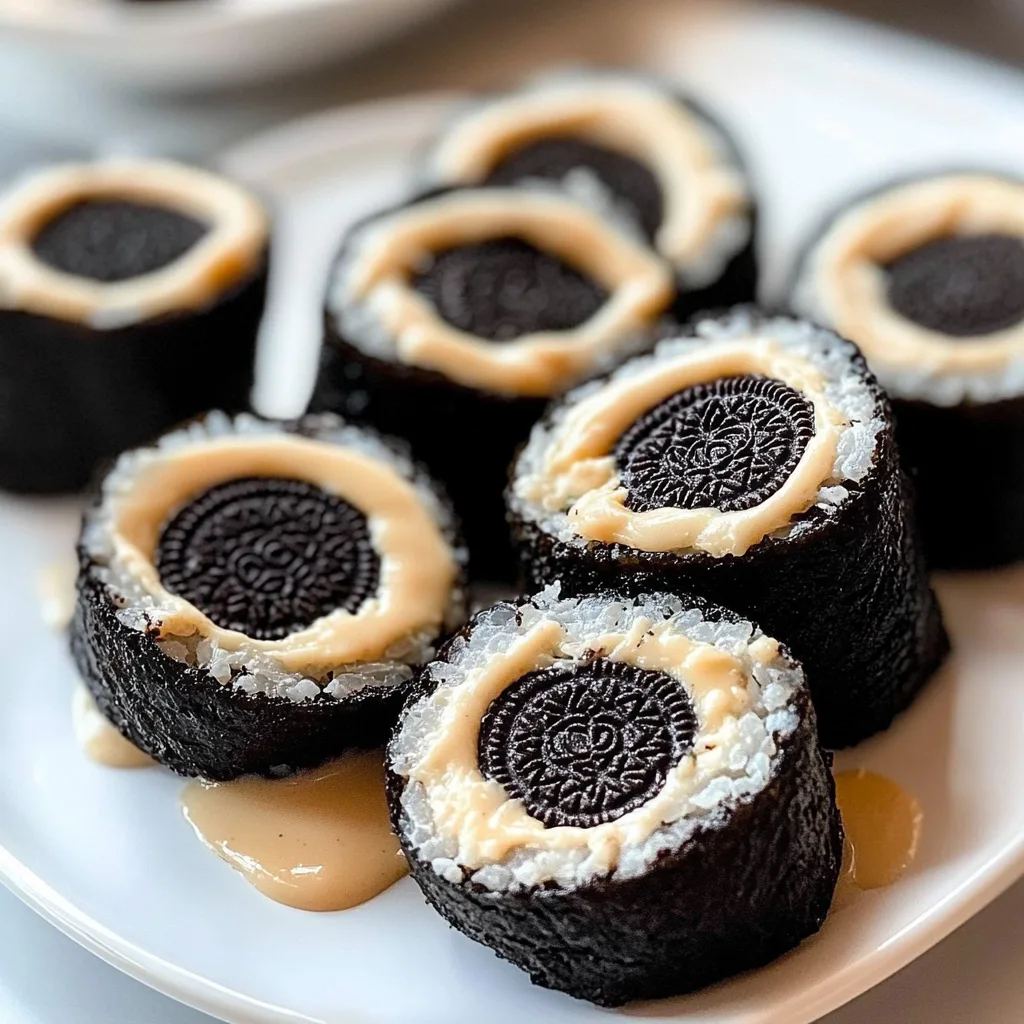
Imagine sinking your teeth into a delightful blend of sweetness, where the rich chocolatey flavor of Oreos meets the gooey crunch of rice crispy treats in a playful twist on sushi—these Oreo sushi rolled treats are bound to make your taste buds dance with joy. The moment you unroll this playful dessert, the aroma of melted marshmallows mingles with the familiar scent of crushed cookies, creating an irresistible invitation that’s hard to resist.
These treats aren’t just a feast for the senses; they evoke memories of childhood fun and creativity, making them perfect for parties or cozy family gatherings. Picture yourself sharing laughter and stories as you roll these sweet delights together, building excitement with each bite that promises a burst of flavor and nostalgia. Whether it’s a birthday bash or a simple evening treat, Oreo sushi rolled treats are guaranteed to impress while bringing everyone together in delicious harmony.
Why Will You Keep Making Oreo sushi rolled treats?
Deliciously Unique: Combining the classic flavors of Oreos and rice crispy treats in a sushi-style presentation is sure to wow your guests.
Quick and Easy: With just 15 minutes of prep time, you can whip up these delightful bites without any cooking involved.
Creamy and Crunchy: The softened cream cheese adds a rich, smooth texture that perfectly complements the crunchy Oreo filling.
Fun for All Ages: Kids and adults alike will love rolling these treats together, making it a perfect activity for family gatherings or parties.
Versatile Treats: Customize with different fillings or toppings for endless variations that fit any occasion!
Oreo sushi rolled treats Ingredients
For the Base
- 2 cups mini marshmallows – These are essential for achieving that gooey texture that holds the treats together.
- 3 tablespoons butter (unsalted) – Unsalted butter adds a rich flavor without extra saltiness; it also helps with melting the marshmallows.
- 4 cups rice cereal – This gives your treats the perfect crunch, balancing the softness of the marshmallows.
For the Oreo Filling
- 1 cup Oreo cookies (crushed) – Crushed Oreos bring a delightful chocolate flavor and texture that complements the treats beautifully.
- 1 cup cream cheese (softened) – Softened cream cheese creates a smooth, creamy filling that binds the crushed Oreos together.
For the Chocolate Drizzle
- 1/2 cup chocolate chips (melted) – Melted chocolate adds an irresistible finishing touch to your Oreo sushi rolled treats, making them even more decadent.
How to Make Oreo sushi rolled treats
1. Melt Together: In a large mixing bowl, melt the 3 tablespoons of unsalted butter and 2 cups of mini marshmallows in the microwave for about 1-2 minutes. Stir until the mixture is smooth and gooey—this will be your delicious base!
2. Combine Cereal: Add in 4 cups of rice cereal to the melted mixture. Stir gently until everything is well combined and coated, ensuring that those crunchy bits soak up all that marshmallow goodness.
3. Flatten the Base: Spread the mixture onto a sheet of parchment paper, using your hands or a spatula to flatten it into a rectangle about 1/2 inch thick. This will serve as the perfect canvas for your tasty filling!
For the Filling:
4. Mix Oreos and Cream Cheese: In a separate bowl, mix 1 cup of crushed Oreo cookies with 1 cup of softened cream cheese until well combined. This creamy, cookie-filled delight will add rich flavor to your treats.
5. Spread Evenly: Carefully spread the Oreo mixture evenly over the rice cereal rectangle, making sure to cover every corner. The contrast between the creamy filling and crispy base is where the magic happens!
6. Roll It Up: Using the parchment paper as your guide, carefully roll the rice cereal and Oreo mixture tightly into a log shape. Take your time—you want it nice and tight for those perfect sushi bites.
7. Chill to Set: Place the log in the refrigerator for about 30 minutes to set. This chilling time helps everything firm up nicely, making it easier to slice later.
8. Slice Into Pieces: Once set, take out your log and slice it into sushi-style pieces using a sharp knife. Each bite should reveal that scrumptious Oreo filling—just delightful!
For the Drizzle:
9. Drizzle Chocolate: Melt 1/2 cup of chocolate chips in a microwave-safe bowl until smooth. Drizzle this luscious chocolate over your sliced treats before serving for an extra touch of sweetness!
Optional: Add colorful sprinkles on top for an extra fun touch!
Exact quantities are listed in the recipe card below.
Pro Tips for Oreo sushi rolled treats
- Right Butter Choice: Use unsalted butter to control the sweetness of your Oreo sushi rolled treats, allowing the cookie flavor to shine.
- Marshmallow Melting: Ensure marshmallows are fully melted without burning; stir gently to achieve a smooth consistency for an even base.
- Cereal Ratio: Measure your rice cereal accurately; too much can make the mixture dry and difficult to roll, compromising your sushi-style presentation.
- Chill Time Importance: Don’t skip the chilling step! It helps the log set properly and makes slicing easier without crumbling.
- Chocolate Drizzle Timing: Wait until just before serving to drizzle melted chocolate on top for a fresh look and better texture.
How to Store and Freeze Oreo sushi rolled treats
- Room Temperature: Store in an airtight container at room temperature for up to 2 days to maintain their chewy texture and delightful flavor.
- Fridge: Keep Oreo sushi rolled treats in the refrigerator for up to 5 days. Make sure they are wrapped tightly to prevent them from absorbing moisture or odors.
- Freezer: For longer storage, freeze the treats in an airtight container for up to 2 months. Thaw in the fridge overnight before enjoying.
- Reheating: If you want a warm treat, gently microwave individual pieces for about 10 seconds. Enjoy the gooey goodness!
Oreo sushi rolled treats Your Way
Get creative with these delightful bites, and let your imagination run wild with delicious twists and flavor combinations!
- Nut-Free: Substitute rice cereal with puffed corn or quinoa for a safe, crunchy alternative. These choices maintain the enjoyable texture while keeping it nut-free.
- Vegan: Swap the cream cheese for a dairy-free cream cheese alternative and use vegan marshmallows. This ensures everyone can enjoy the treat without any animal products.
- Chocolate Lover’s Delight: Add 1/2 cup of mini chocolate chips to the rice cereal mixture for an extra chocolatey crunch. The combination of flavors will satisfy any sweet tooth and create a rich experience.
- Fruit Infusion: Mix in 1/2 cup of finely chopped strawberries or raspberries into the Oreo filling. The burst of fruitiness will brighten up each bite and add a fresh twist.
- Peanut Butter Bliss: Swirl in 1/4 cup of creamy peanut butter into the cream cheese filling. This adds a nutty richness that pairs perfectly with the sweetness of Oreos.
- Spicy Kick: Sprinkle a pinch of cayenne pepper or chili powder into the melted chocolate drizzle. This unexpected heat will create an intriguing contrast that adventurous eaters will love.
- Gluten-Free: Use gluten-free Oreos and rice cereal to make this dessert accessible without sacrificing flavor. Everyone deserves to indulge in these fun treats!
Make Ahead Options
This Oreo sushi rolled treats recipe is perfect for meal prep, allowing you to enjoy a delightful dessert without the last-minute rush. You can prepare the base ingredients—2 cups of mini marshmallows, 3 tablespoons of unsalted butter, and 4 cups of rice cereal—up to 24 hours in advance. Simply melt the butter and marshmallows together, mix in the rice cereal, and spread it out to cool. The Oreo filling made from 1 cup of crushed Oreo cookies and 1 cup of softened cream cheese can also be prepped ahead of time; just store it in the fridge until you’re ready to assemble. Once your base is set and chilled for about 30 minutes, roll it with the filling and slice into sushi-style pieces. To maintain quality, drizzle the 1/2 cup of melted chocolate just before serving for that fresh touch. By prepping ahead, you save valuable time while ensuring these sweet treats are ready to impress your family or guests!
Oreo sushi rolled treats Recipe FAQs
Can I use different types of cereal for the base?
Absolutely! While rice cereal gives that classic crispy texture, you can experiment with other cereals like Cornflakes or even granola. Just make sure they’re crunchy enough to hold up when mixed with the melted marshmallow and butter.
How should I store leftover Oreo sushi rolled treats?
To keep your delicious treats fresh, store them in an airtight container in the refrigerator. They’ll stay tasty for up to 3 days. If you’d like a softer texture, let them sit at room temperature for about 10-15 minutes before enjoying!
Can I freeze these treats for later enjoyment?
Yes, you can freeze Oreo sushi rolled treats! Wrap them tightly in plastic wrap or aluminum foil, then place them in a freezer-safe container. They can be frozen for up to 2 months. When you’re ready to enjoy, simply thaw them in the fridge overnight.
What if my marshmallow mixture is too sticky?
If your mixture is too sticky after melting the marshmallows and butter, try adding a little more rice cereal until it reaches a consistency that’s easier to work with. Remember, it should be slightly moist but not overly gooey!
How many servings does this recipe yield?
This delightful recipe yields about 4 servings. Each serving contains approximately 250 calories, making it a fun treat that’s perfect for sharing with family or friends during movie night or any special occasion!
Can I make this dessert dairy-free or vegan?
Definitely! For a dairy-free version, use vegan cream cheese and dairy-free chocolate chips. You can also substitute the butter with coconut oil and use vegan mini marshmallows. Just ensure all your ingredients are labeled as vegan-friendly!