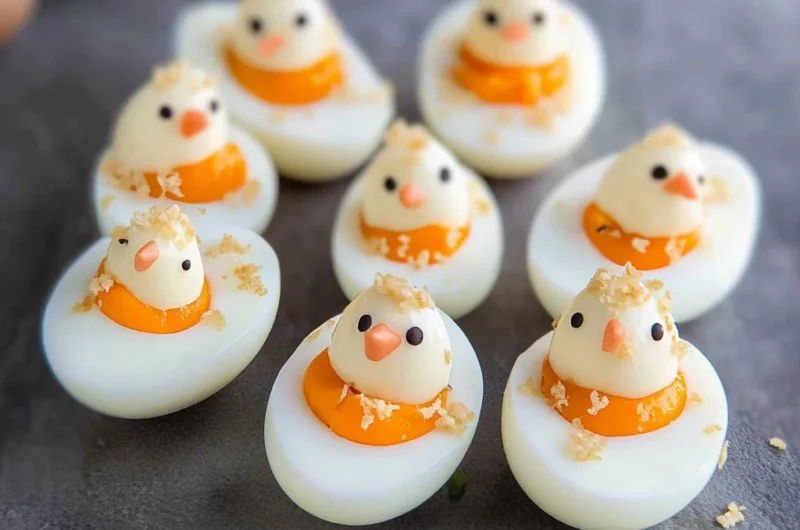
Imagine a platter of Deviled Egg Chicks, their vibrant yellow filling bursting with flavor, perched cutely atop creamy whites, ready to delight your taste buds. The aroma of tangy mustard and a hint of paprika wafting through the air creates an irresistible invitation, making every gathering feel like a festive occasion.
These charming little bites always remind me of childhood family gatherings, where laughter echoed around the table as we devoured these whimsical treats. Perfect for spring picnics or holiday brunches, Deviled Egg Chicks promise to add a dash of fun and flavor to any event, leaving everyone eagerly anticipating that first delightful bite.
Why are Deviled Egg Chicks so fun?
Delightful to look at, these adorable Deviled Egg Chicks bring a whimsical twist to a classic appetizer!
Quick and easy, they come together in just 30 minutes, making them perfect for last-minute gatherings.
Flavor-packed, each bite is creamy with a hint of tang that will keep your guests coming back for more.
Versatile enough for any occasion, they’re ideal for picnics, brunches, or holiday parties!
Kid-friendly, everyone will love their charming appearance, ensuring they’re a hit with the whole family!
Deviled Egg Chicks Ingredients
For the Eggs
- Large eggs – Choose fresh eggs for the best flavor and texture.
- Mayonnaise – Adds creaminess; consider using Greek yogurt for a lighter option.
- Dijon mustard – Gives a zesty kick; use yellow mustard if preferred.
For the Filling
- Salt – Enhances overall flavor; adjust to taste based on dietary needs.
- Paprika – Sprinkling on top adds color and a hint of smokiness.
- Chives or dill – Fresh herbs can elevate the taste; you can swap them with parsley if desired.
For the Decoration
- Olives (black or green) – Cut into tiny pieces for eyes, adding an appealing contrast.
- Carrot (shredded or diced) – Perfect for making beaks and adding crunch; use bell pepper if you’re out of carrots.
Creating these delightful Deviled Egg Chicks will surely bring smiles to your table!
How to Make Deviled Egg Chicks
1. Boil the eggs by placing them in a pot and covering them with cold water. Bring to a gentle boil, then cover and remove from heat, letting them sit for 12 minutes.
2. Cool the eggs by transferring them to an ice bath. Allow them to chill for at least 10 minutes, which helps make peeling easier and prevents overcooking.
3. Peel the eggs carefully, tapping them gently on a hard surface to crack the shell. Start peeling from the wider end where there’s usually an air pocket for easier removal.
4. Slice each egg in half lengthwise using a sharp knife; this will create two halves per egg. Gently scoop out the yolks into a mixing bowl while keeping the whites intact for your adorable chicks.
5. Mash the yolks with mayonnaise, mustard, salt, and pepper until smooth and creamy. Adjust seasoning to taste—and don’t be afraid to add a pinch of paprika for extra flavor!
6. Fill the egg whites with your yolk mixture using a spoon or piping bag for precision; this gives your chicks that cute little body shape we all love.
7. Decorate your chick faces by using small pieces of olives or carrots for eyes and tiny triangles of bell pepper for beaks. Get creative; it’s all about making them look fun!
8. Chill the finished deviled egg chicks in the refrigerator for about 30 minutes before serving, allowing flavors to meld and ensuring they’re refreshingly cool.
Optional: Sprinkle with fresh herbs like dill or parsley before serving for a pop of color!
Exact quantities are listed in the recipe card below.
Tips for the Best Deviled Egg Chicks
- Perfect Boil: For creamy yolks, boil eggs for 10-12 minutes, then plunge into ice water to stop cooking immediately.
- Use Fresh Eggs: Older eggs can be harder to peel. Use fresh eggs for easier peeling and a better presentation in your deviled egg chicks.
- Smooth Filling: Blend yolks with mayonnaise and mustard until smooth. A creamy filling makes your Deviled Egg Chicks delightful and easy to pipe.
- Piping Technique: Use a piping bag or a ziplock with the corner cut off for neat, chick-shaped deviled filling that looks adorable and inviting.
- Creative Garnish: Add fun touches like paprika for color or chives for “grass” to elevate your Deviled Egg Chicks’ appearance—presentation matters!
- Avoid Overstuffing: Don’t overfill the whites; it can make them topple over. Keep the filling level just below the egg white rim for stability.
How to Store and Freeze Deviled Egg Chicks

Room Temperature: Avoid leaving deviled egg chicks out for more than 2 hours, as they can spoil quickly. Keep them cool and covered until serving.
Fridge: Store leftover deviled egg chicks in an airtight container in the fridge for up to 3 days. This helps retain their flavor and freshness.
Freezer: It’s best not to freeze deviled egg chicks, as the texture of the eggs can change. However, you can freeze the filling separately for up to 2 months.
Reheating: If you’ve made a batch ahead of time, simply thaw in the fridge overnight before enjoying them again—do not reheat these delicate treats!
Deviled Egg Chicks Variations to Explore
Feel free to let your creativity soar with these delightful twists, adding unique flavors and textures to your deviled egg chicks!
- Spicy Kick: Add a dash of cayenne pepper or smoked paprika for a zesty bite. The heat will surprise and delight your guests!
- Herbed Delight: Mix in fresh dill or chives for a burst of garden freshness. These herbs elevate the classic flavor profile beautifully.
- Avocado Twist: Swap out mayonnaise for creamy avocado for a healthier, vibrant alternative. This adds a luscious texture and a hint of earthiness.
- Bacon Crunch: Incorporate crispy bacon bits into the filling for an irresistible smoky crunch. It’s a savory upgrade that everyone will love!
- Cheesy Goodness: Fold in some grated cheddar cheese or cream cheese for a rich, indulgent flavor. This variation makes each bite decadently creamy.
- Veggie Boost: Stir in finely chopped bell peppers or celery for extra crunch and nutrition. This adds colorful vibrancy and enhances the overall texture.
- Mediterranean Flair: Blend in feta cheese, olives, and sun-dried tomatoes for a Mediterranean twist. It’s an exciting way to add bold flavors to your chicks!
- Sweet Touch: A hint of sweet relish or diced pickles can balance the flavors beautifully. This unexpected sweetness will keep everyone coming back for more!
Make Ahead Options
If you’re looking to save time while still impressing your guests, these Deviled Egg Chicks are perfect for meal prep! You can make the egg yolk filling up to 3 days in advance. Simply boil your eggs, cool them in ice water, and peel them. Then, mix the yolks with mayonnaise, mustard, and seasonings, and store the mixture in an airtight container in the fridge. For best quality, keep the egg whites separate until you’re ready to assemble. On the day of serving, simply pipe or spoon the filling into the egg whites and decorate with your choice of toppings. This way, you can enjoy a delicious and adorable appetizer without any last-minute stress!
Deviled Egg Chicks Recipe FAQs
What kind of eggs should I use for deviled egg chicks?
For the best results, choose large, fresh eggs. Fresh eggs are harder to peel, so if possible, use eggs that are about a week old. This slight aging makes peeling easier while still keeping the yolks creamy and delicious!
How long can I store leftover deviled egg chicks?
You can store your deviled egg chicks in an airtight container in the refrigerator for up to 2 days. Make sure to cover them well with plastic wrap to prevent them from drying out or absorbing other fridge odors. They’re best enjoyed fresh, though—so invite a few friends over for an impromptu gathering!
Can I freeze deviled egg chicks?
Freezing is not recommended for deviled egg chicks as the texture can change significantly upon thawing, making them watery and unappetizing. If you’re looking to prep ahead, consider making the filling separately and storing it in the fridge for up to 3 days instead.
What should I do if my egg yolks are too crumbly?
If you find your yolks crumbling instead of blending smoothly, try adding a little more mayonnaise or mustard, one teaspoon at a time. This will help create a creamier consistency. A splash of pickle juice or vinegar can also add flavor and moisture!
Are there dietary considerations for deviled egg chicks?
Absolutely! For a healthier twist, you can substitute Greek yogurt for mayonnaise, which will give you a creamy texture with fewer calories. If you’re accommodating dairy-free diets, look for vegan mayo options available at most grocery stores—your deviled egg chicks can still be adorable and tasty!
Can I customize the toppings on my deviled egg chicks?
Definitely! You can get creative with toppings like paprika, chives, or even tiny bits of olives for eyes. Feel free to experiment with different flavors by adding spices such as curry powder or dill into your yolk mixture before piping it back into the whites. Enjoy making them uniquely yours!
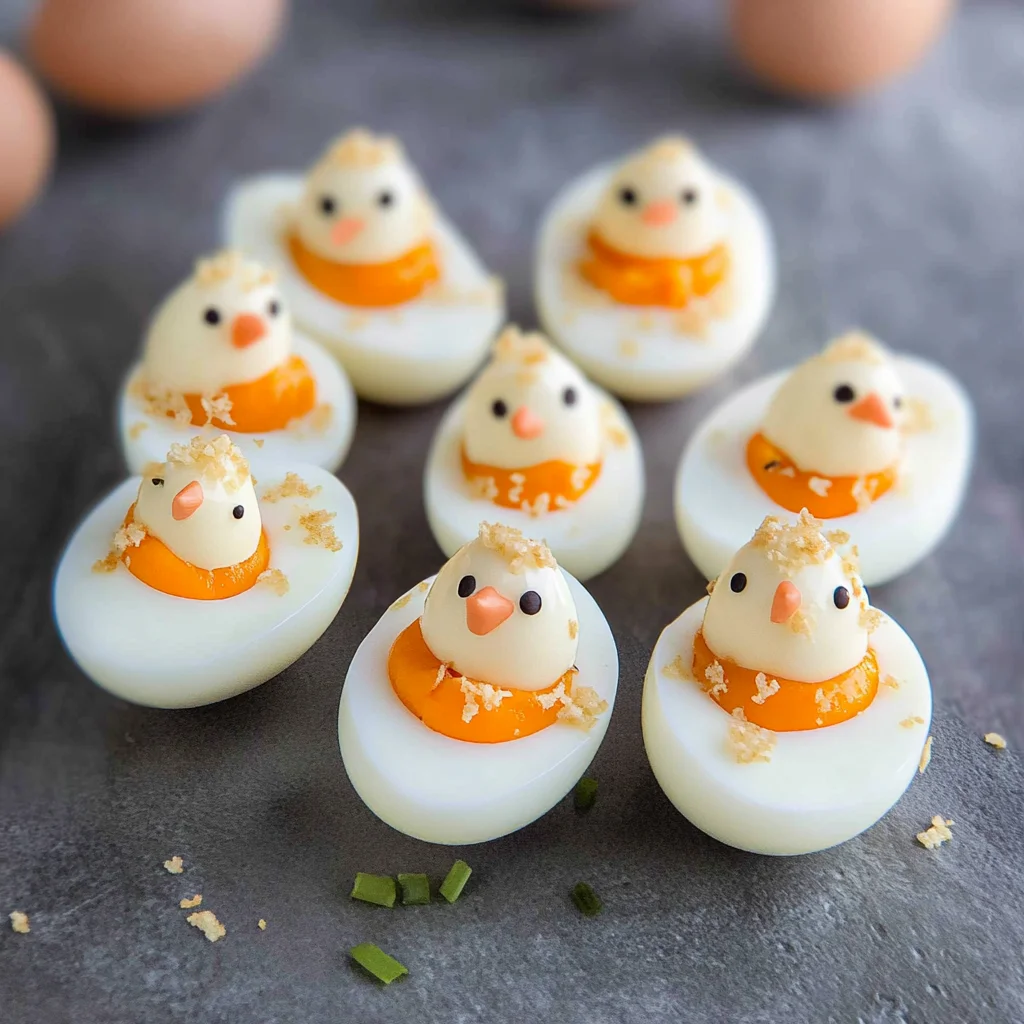
Deviled Egg Chicks
Ingredients
Method
- Boil the eggs by placing them in a pot and covering them with cold water. Bring to a gentle boil, then cover and remove from heat, letting them sit for 12 minutes.
- Cool the eggs by transferring them to an ice bath. Allow them to chill for at least 10 minutes.
- Peel the eggs carefully, tapping them gently on a hard surface to crack the shell.
- Slice each egg in half lengthwise and scoop out the yolks into a mixing bowl.
- Mash the yolks with mayonnaise, mustard, salt, and pepper until smooth and creamy.
- Fill the egg whites with your yolk mixture using a spoon or piping bag.
- Decorate your chick faces using small pieces of olives or carrots for eyes and bell pepper for beaks.
- Chill the finished deviled egg chicks in the refrigerator for about 30 minutes before serving.